The Easysoft ODBC-MongoDB Driver is installed on the computer where your applications are running. ODBC applications access ODBC drivers through the ODBC Driver Manager and a data source. The data source tells the Driver Manager which ODBC driver to load, which MongoDB server to connect to and how to connect to it. This chapter describes how to create data sources, use DSN-less connections and configure the Easysoft ODBC-MongoDB Driver.
Before setting up a data source, you must have successfully installed the Easysoft ODBC-MongoDB Driver.
For Easysoft ODBC-MongoDB Driver installation instructions, see Installation.
This section describes how to configure the Easysoft ODBC-MongoDB Driver to connect to MongoDB by using a data source or a DSN-less connection string.
There are two ways to set up a data source to your MongoDB data:
By default, the Easysoft ODBC-MongoDB Driver installation creates a SYSTEM data source named [MONGODB_SAMPLE]. If you are using the unixODBC included in the Easysoft ODBC-MongoDB Driver distribution, the SYSTEM odbc.ini file is in /etc.
If you built unixODBC yourself, or installed it from some other source, SYSTEM data sources are stored in the path specified with the configure option --sysconfdir=directory. If sysconfdir was not specified when unixODBC was configured and built, it defaults to /usr/local/etc.
If you accepted the default choices when installing the Easysoft ODBC-MongoDB Driver, USER data sources must be created and edited in $HOME/.odbc.ini.
|
To display the directory where unixODBC stores SYSTEM and USER data sources, type odbcinst -j. By default, you must be logged in as root to edit a SYSTEM data source defined in /etc/odbc.ini. |
You can either edit the sample data source or create new data sources.
Each section of the odbc.ini file starts with a data source name in square brackets [ ] followed by a number of attribute=value pairs.
The Driver attribute identifies the ODBC driver in the odbcinst.ini file to use for a data source.
When the Easysoft ODBC-MongoDB Driver is installed into unixODBC, it places an Easysoft ODBC-MongoDB entry in odbcinst.ini. For Easysoft ODBC-MongoDB Driver data sources therefore, you need to include a Driver = Easysoft ODBC-MongoDB entry.
To configure a MongoDB data source, in your odbc.ini file, you need to specify:
Driver = Easysoft ODBC-MongoDB
If you need to supply a user name and password to access your MongoDB database, specify these authentication details in the data source as well. For example:
The Easysoft ODBC-MongoDB Driver must be able to find the following shared objects, which are installed during the Easysoft ODBC-MongoDB Driver installation:
By default, this is located in /usr/local/easysoft/unixODBC/lib.
By default, this is located in /usr/local/easysoft/lib.
By default, this is located in /usr/local/easysoft/lib.
You may need to set and export LD_LIBRARY_PATH, SHLIB_PATH or LIBPATH (depending on your operating system and run-time linker) to include the directories where libodbcinst.so, libeslicshr.so and libessupp.so are located.
|
The shared object file extension (.so) may vary depending on the operating system (.so, .a or .sl). |
The isql query tool lets you test your Easysoft ODBC-MongoDB Driver data sources.
To test the Easysoft ODBC-MongoDB Driver connection
1. Change directory into /usr/local/easysoft/unixODBC/bin.
2. Type ./isql.sh -v data_source, where data_source is the name of the target data source.
3. At the prompt, type an SQL query. For example:
SQL> select city from scratch;
Type help to return a list of tables:
To connect an ODBC application on a Windows machine to a MongoDB database:
1. Open ODBC Data Source Administrator:
The ODBC Data Source Administrator dialog box is displayed:
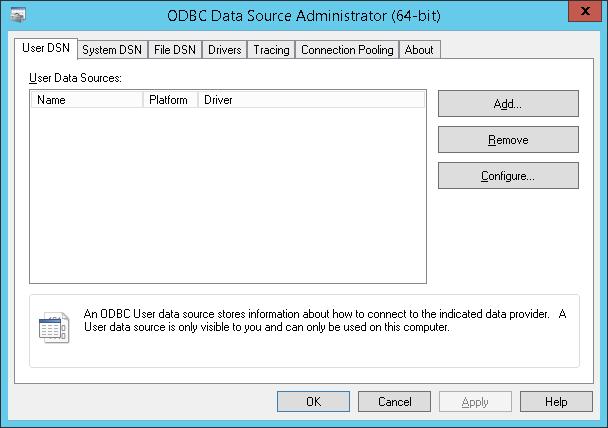
2. Select the User DSN tab to set up a data source that only you can access.
Select the System DSN tab to create a data source which is available to anyone who logs on to this Windows machine.
3. Click Add... to add a new data source.
The Create New Data Source dialog box displays a list of drivers:
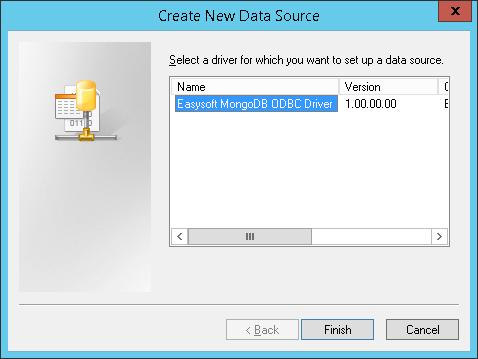
4. Select Easysoft ODBC-MongoDB Driver and click Finish.
The Easysoft ODBC-MongoDB Driver DSN Setup dialog box is displayed:
For details of the attributes that can be set on this dialog box, see Attribute Fields.
This section lists the attributes which can be set for the Easysoft ODBC-MongoDB Driver in a table showing:
Attributes which are text fields are displayed as value.
Attributes which are logical fields can contain either 0 (to set to off) or 1 (to set to on) and are displayed as "0|1".
If an attribute can contain one of several specific values then each possible entry is displayed and separated by a pipe symbol.
For example, in the statement:
the value entered may be "1", "2" or "3".
The name of the User or System data source to be created, as used by the application when calling the SQLConnect or SQLDriverConnect functions.
Descriptive text that may be retrieved by certain applications to describe the data source.
The hostname or IP address of the MongoDB database server that you want to connect to.
By default, the Easysoft ODBC-MongoDB Driver attempts to connect to the default MongoDB port, 27017. If MongoDB is listening on a different port at your site, append :port to the Server attribute value. For example, mymachine:27018.
The MongoDB database that you contains the data that you want to access
If you need to supply a user name to access your MongoDB database, supply it with the User Name attribute.
To retrieve MongoDB data, the user needs to have the read database role. To update MongoDB data, the user needs to have the readWrite database role
If you need to supply a user name to access your MongoDB database, supply the password for this user name with the Password attribute
If you store a custom schema generated with the Easysoft MongoDB Schema Editor in a MongoDB server, supply the hostname or IP address of this server with the Schema Server attribute. If you do not want to use a custom schema or want the schema to be stored on the same host as Server, omit this attribute.
By default, the Easysoft ODBC-MongoDB Driver samples your MongoDB data to generate the schema it needs to describe the data to ODBC client applications. If you choose to customise the schema (for example, you do not want to expose all fields in a document to your client application), you have the option to store the schema in a MongoDB server
If you store a custom schema generated with the Easysoft MongoDB Schema Editor in a MongoDB server, specify the database where the schema is located with the Schema Database attribute. Otherwise omit this attribute
If you need to supply a user name to access the database where your custom schema is stored, supply it with the Schema User Name attribute. To view the schema, the user needs to have the read database role. To create a schema, the user needs to have:
If you need to supply a user name to access the database where your custom schema is stored, supply the password for this user name with the Schema User Name attribute.
When set to Yes, MongoDB types that the Easysoft ODBC-MongoDB Driver would normally map to SQL_VARCHARs are mapped to SQL_WVARCHARs instead. By default, Default to WCHAR is OFF (Set to No). Enable this setting if you are using a Unicode ODBC application that expects Unicode data types. For example, Perl DBD ODBC when built with Unicode support.
You can also use the Easysoft Schema Editor to define how MongoDB data types are mapped to ODBC data types.
Some applications (for example MicroStrategy, Oracle Heterogeneous Services (DG4ODBC), Oracle BI Administration Tool) always pass a user name and password on the ODBC connection string, regardless of whether they are required by the target database. If your application behaves in this way and your MongoDB database does not require a user name and a password, enable this setting.
The string column length to use. MongoDB does not provide the length for string columns in its column metadata. By default, the Easysoft ODBC-MongoDB Driver uses a string length of 255, which you can override with this setting
When in schema discovery mode, the Easysoft ODBC-MongoDB Driver scans 100 documents to generate a schema for a collection. To change the number of documents that the driver scans, use the Preview Rows attribute. For example, if the 101st document contained a field whose value was a different type to that of the preceding 100 documents, you would set Preview Rows to 101. You may also need to increase the Preview Rows size, if a field contained a value whose length exceeded the maximum length of that field's value in the first 100 documents. (In this circumstance, you may get an error similar to "The (maximum) expected data length is x while the returned data length is y.")
To scan all documents in a collection (which will have performance implications for large collections), set Preview to -1.
Enable SSL if you want to connect to MongoDB over an encrypted connection and the target MongoDB server has been started with --sslMode allowSSL or --sslMode preferSSL. If the target MongoDB server has been started with --sslMode requireSSL, you must enable SSL, otherwise you will get the error "An error occurred: Failed to read 4 bytes from socket" when the driver attempts to do some work (e.g. executes a query).
Enable Weak Validation to connect to MongoDB over an SSL connection without presenting a certificate. The MongoDB server needs to permit such a connection, i.e, have been started with --sslWeakCertificateValidation or --sslAllowConnectionsWithoutCertificates. If you want to connect without presenting a certificate, you need to enable SSL and Weak Validation only. None of the other SSL attributes (PEM File, CA File etc.) are required.
If you attempt to connect to a MongoDB server that permits an SSL connection without a certificate you will get the error "Failed to handshake and validate TLS certificate" unless you enable Weak Validation.
The path to the PEM file for the MongoDB server certificate. For example, C:\SSL\MongoDB.pem.
The file containing trusted certificates. For example, C:\SSL\MongoDB.crt. The file must include the Certificate Authority (CA) file for the MongoDB server certificate.
The directory containing trusted certificates. For example, C:\SSL. The directory must contain the CA file for the MongoDB server certificate . The CA file name must be in "hash format", for example bd035bae.0. If you specify the CA Directory attribute, omit the CA File attribute.
To prevent a connection to a MongoDB server with a revoked certificate, use CRL File specify the file that contains revoked certificates.
Enable this setting if you are connecting to a cloud-based MongoDB instance. For example, MongoDB Atlas.
If you have specified a Schema Database and are connecting to a cloud-based MongoDB instance, enable this setting.
The authentication database for User Name.
Whether NULLS are inserted. When insert_nulls is set to No (the default), this example INSERT statement:
insert into table t1 ( c1, c2 ) values( 'value', NULL )
When insert_nulls is set to Yes, this example INSERT statement:
insert into table t1 ( c1, c2 ) values( 'value', NULL )
In addition to using a data source, you can also connect to a database by using a DSN-less connection string of the form:
SQLDriverConnect(..."DRIVER={Easysoft ODBC-MongoDB};
Server=mymachine;Database=mydb;"...)
where user and password are a valid MongoDB user name and password. You need to use the Easysoft ODBC-MongoDB DRIVER keyword to identify the Easysoft ODBC-MongoDB Driver.
Other Easysoft ODBC-MongoDB Driver attribute settings, as described in Setting Up Data Sources on Unix, can be added to the connection string using the same PARAMETER=value; format.
On 64-bit Windows, esmgse.exe is located in the %programfiles(x86)%\Easysoft Limited\Easysoft MongoDB ODBC Driver\Schema Editor folder.
On 32-bit Windows, esmgse.exe is located in the %programfiles%\Easysoft Limited\Easysoft MongoDB ODBC Driver\Schema Editor folder.
esmgse.exe accepts these command line arguments:
If you start the Easysoft MongoDB Schema Editor without specifying the MongoDB server where the schema is stored, the editor starts in View Only mode. In this mode, you can examine your MongoDB data and the default schema generated by the editor, but cannot make any changes.
The Easysoft MongoDB Schema Editor contains three panes. The left hand pane, Database and Tables, displays the collections in the MongoDB database that was specified in the data source or on the command line.
The bottom right hand pane, Data Sample, shows the documents that were used to generate the schema. By default, the Data Sample pane shows the first 100 documents.
The top right hand pane, Current Table, displays the schema for the choosen collection:
The column name that will be returned by the Easysoft ODBC-MongoDB Driver to the application. This will same as the corresponding field in the MongoDB document. You may need to change the column name if the MongoDB field on which it is based contains character that the ODBC layer / application cannot handle. To change the column name, double-click the column name and then type the new value.
The ODBC SQL data type that will be returned by the Easysoft ODBC-MongoDB Driver to the application. To change the ODBC SQL data type, choose a different type from the list. For example, you might change a Boolean MongoDB field from a SQL_TINYINT to a SQL_BIT.
If the field is part of a MongoDB index, Yes displays in SQL Index column. If you hover over the column with your mouse pointer, a popup window displays to show you all the indexes that field is included in. The popup window also show you the order in which the field is included in a compound index, if applicable.
The BSON type for the MongoDB field value.
The string length, if a string data type is shown in the SQL Type column. The Easysoft ODBC-MongoDB Driver reports the length shown here to the application. To change the string length, double-click the length and then type the new value.
The precision, if a SQL_NUMERIC data type is shown in the SQL Type column. The Easysoft ODBC-MongoDB Driver reports the precision shown here to the application. To change the precision, double-click the precision and then type the new value.
The scale, if a SQL_NUMERIC data type is shown in the SQL Type column. The Easysoft ODBC-MongoDB Driver reports the scale shown here to the application. To change the scale, double-click the scale and then type the new value.
Whether the column's contents and meta data are visible to the ODBC application.
If you have not already configured an Easysoft ODBC-MongoDB Driver data source, please refer to thE instructions in Setting Up Data Sources on Windows.
1. Open ODBC Data Source Administrator:
The ODBC Data Source Administrator dialog box is displayed:
2. Select your Easysoft ODBC-MongoDB Driver data source and then choose Configure.
3. Type the hostname or IP address of the server where you want to store the schema in the Schema Server box.
4. Type the name of the schema in the Schema Database box.
The Easysoft ODBC-MongoDB Driver creates a MongoDB database with the name you specify to store the schema collections in.
5. If MongoDB authentication is enabled on the server where the schema is stored, type a valid user name for this server in the Schema User Name box.
6. Type the password for this user name in the Schema Password box.
7. Choose the Schema button to launch the Easysoft MongoDB Schema Editor.
8. Choose Yes when prompted whether to create a new Schema.
9. In the Easysoft MongoDB Schema Editor make the changes you want.
10. Choose Save and then choose Exit.
For the Easysoft ODBC-MongoDB Driver to be able to retrieve a MongoDB field value, that field needs to be described in a schema. The schema can be either the one that the Easysoft ODBC-MongoDB Driver generates automatically or one that you create in the Easysoft MongoDB Schema Editor. If a field is not described in a schema, the Easysoft ODBC-MongoDB Driver returns NULL rather than the field's value.
If you add document to a collection that contains types that are different to those in the documents sampled by the driver or schema editor, you may need to manually add columns. For example, you generated a schema in the Easysoft MongoDB Schema Editor based on a sample size of 100 documents; document 500 contains fields with different types. Rather than regenerate the schema based on a sample size of 500, you choose to manually add columns for the new fields.
1. In the Easysoft MongoDB Schema Editor, in the Tables pane, select the row below which you want the new column to appear.
3. In SQL Name, double click the column name and type a new value if you want a different column name to be returned to the application.
4. In SQL Type, select the ODBC SQL data type that will be returned to the application.
5. In MongoDB Name, double click the column name and type the name of the corresponding MongoDB field name.
6. In MongoDB Type, select the BSON type for the MongoDB field value.
7. If SQL Type is a string data type, in Length, double-click the length and type the length of the field to be returned to the application.
8. If SQL Type is a SQL_NUMERIC data type, in Precision, double-click the precision and type the precision of the field to be returned to the application.
9. If SQL Type is a SQL_NUMERIC data type, in Scale, double-click the scale and type the scale of the field to be returned to the application.
10. When you have finished adding columns, choose Save.
If do not want MongoDB field to be visible in your application you can either hide or delete the corresponding column in the Easysoft ODBC-MongoDB Driver.
1. Locate the column in the Easysoft MongoDB Schema Editor and then choose Hide.
1. Select the column in the Easysoft MongoDB Schema Editor and then choose Remove.
Top-level arrays can be expanded into virtual tables. The Easysoft MongoDB Schema Editor displays a Virtual Table check box next to eligible fields. Select this check box to expland an array into virtual tables.
To illustrate the virtual tables feature, here is an example based on this MongoDB document:
stock: [ { size: "S", qty: 25 }, { size: "M", qty: 50 } ],
Stock is an array and so can be expanded into a virtual table. The resultant table is inventory_stock:
"_id", "stock$index", "stock$value"
"54cf68badc5ac264551cb974", 0, "{ "size" : "S", "qty" : 25.000000 }"
"54cf68badc5ac264551cb974", 1, "{ "size" : "M", "qty" : 50.000000 }"
Oracle is a registered trademark of Oracle Corporation and/or its affiliates.
© 1993 - 2024 Easysoft Limited. All rights reserved. Oracle® is a registered trademark of Oracle® Corporation and/or its affiliates. Other trademarks and registered trademarks appearing on easysoft.com are the property of their respective owners.